Connect Raspberry Pi Behind Router
Can you truly unlock the full potential of your Raspberry Pi, even when it's hidden behind the protective wall of a router? The answer is a resounding yes, and the process, while seemingly complex, is far more accessible than you might imagine.
In an era where remote access is no longer a luxury but a necessity, the ability to securely connect to your Raspberry Pi, regardless of your location, has become an essential skill. Whether you're a tech enthusiast, a seasoned professional, or someone simply curious about the capabilities of this miniature marvel, the power to manage and interact with your Raspberry Pi from anywhere in the world is a game-changer. This comprehensive guide will unravel the mysteries of establishing a secure connection, ensuring you can remotely access your device without the complexities of traditional port forwarding.
The concept of connecting a Raspberry Pi behind a router might initially sound daunting, filled with technical jargon and complex configurations. However, fear not! This article is designed to break down the process step by step, transforming what seems complex into a clear, understandable journey. We'll navigate the intricacies of network configurations, explore the tools and techniques required, and empower you to securely access your Raspberry Pi, no matter where you are.
As technology continues to evolve, the Raspberry Pi remains a versatile tool for various applications, from home automation and server management to IoT projects and educational endeavors. The ability to remotely access your Raspberry Pi allows you to work on projects away from home, troubleshoot issues, or access files remotely. This guide serves as your passport to unlocking these possibilities.
To connect to your Raspberry Pi remotely, there are several methods you can employ. One of the most common approaches is using SSH port forwarding, which allows you to create an encrypted tunnel between your local machine and the Raspberry Pi. SSH (Secure Shell) facilitates secure remote access to the command line of your Raspberry Pi, enabling you to manage and control it from another device. However, it's important to understand that connecting a Raspberry Pi behind a router requires some technical knowledge to function optimally.
This guide addresses the challenges of remote access, especially when faced with NAT (Network Address Translation) routers that often restrict access due to their inability to easily open ports. Understanding the complexities of connecting a Raspberry Pi behind a NAT router is crucial for those seeking to remotely manage and control their devices.
There are several ways to connect to your Raspberry Pi if it is behind a NAT router. The easiest way is to use SSH port forwarding. This will allow you to connect to your pi anywhere in the world as long as you have an internet connection. However, the issue with NAT is that it doesnt allow you to open ports easily.
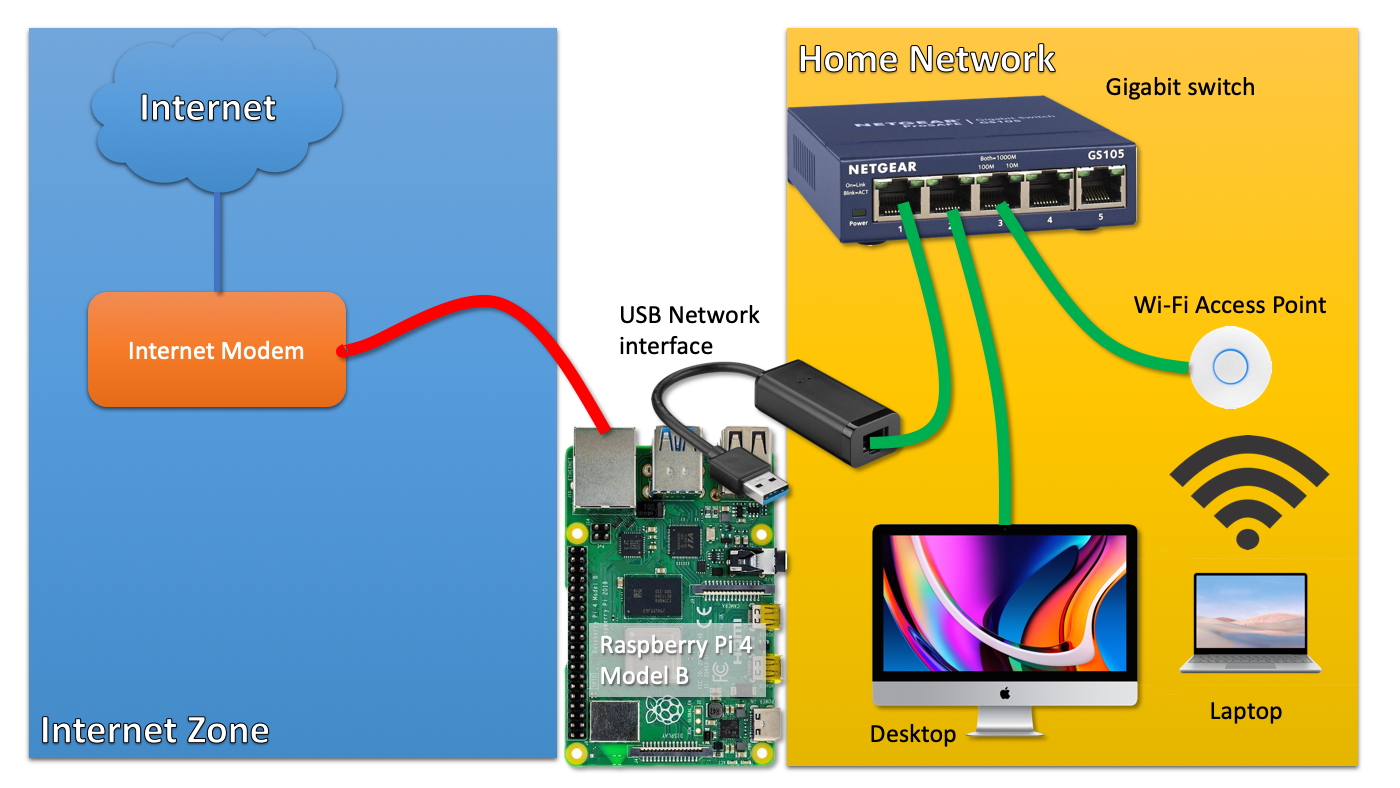
For the purpose of our exploration, lets envision a scenario. Imagine a Raspberry Pi connected to a home network, hidden behind a router, and requiring remote access for managing or controlling various operations. The steps we will outline here will provide a clear path to achieving this.
The first step is to enable SSH on your Raspberry Pi. This simple action unlocks a world of possibilities, allowing you to remotely access your device's command line from another device. Once SSH is enabled, you can begin exploring the other methods for remote access.
Consider a situation where the Raspberry Pi is connected to a Wi-Fi network with internet access, but you lack physical access to the router and cannot change its settings. This scenario often presents a challenge, but we'll explore solutions that circumvent this limitation. The goal is to share the internet connection through a second wireless router connected to the Raspberry Pi via Ethernet.
The primary focus is to bypass the complexities of network configurations and provide secure access. This guide seeks to eliminate the need for port forwarding, simplifying the process and making remote access more accessible to a wider audience. With the use of a remoteiot service, you can manage and control your Raspberry Pi remotely, offering a secure and efficient solution.
Before you begin, ensure that your router is ready to go. The preparation phase is essential for a smooth and successful setup. For those employing the remoteiot service, opening the remoteiot portal in your browser and logging into the dashboard is a crucial step.
Upon successful login, you should see your Raspberry Pi listed among your account devices. This confirmation is a sign that the connection is established and you can begin managing and controlling your device remotely. Keep in mind that your Raspberry Pi's model, such as a 3 B+ or 4, doesn't significantly impact the overall process.
As a beginner, the world of networking can seem complex. However, remember that the goal is to provide clarity and simplicity, transforming what appears complex into something understandable. This article emphasizes the need for secure remote access, helping you work on Pi projects away from home, troubleshoot issues, or access files remotely. This is a testament to the flexibility that Raspberry Pi offers, providing you with the freedom to connect over the internet from any device.
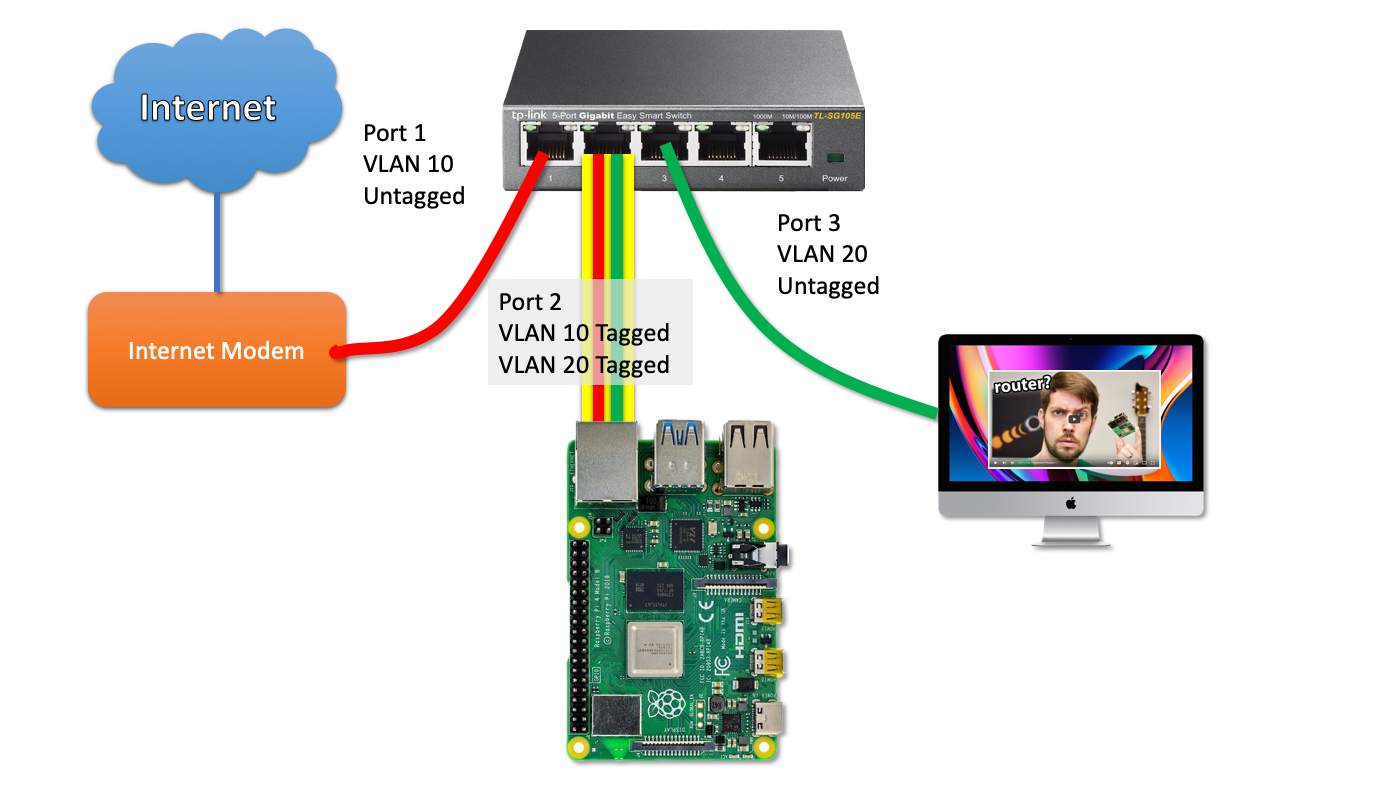
For a more technical deep dive, lets talk about the steps. First, you'll need to enable SSH (Secure Shell) on your Raspberry Pi, and then enable port forwarding on your router. SSH tunneling creates an encrypted tunnel between your local machine and the Raspberry Pi. This method is an important step.
When you connect your Raspberry Pi behind a router, you're essentially integrating it into your local network. This guide serves as your passport to unlocking these possibilities, allowing you to work on projects away from home or access files remotely. It's like having a secret portal to your Raspberry Pi.
The objective is to create an accessible and easy-to-follow guide that eliminates the need for complicated procedures. We will navigate the complexities of network configurations, exploring the tools and techniques required to ensure secure access.
This guide aims to provide clarity and simplicity, turning a potentially complex process into something manageable. From the outset, remember that the goal is to enable you to remotely manage your Raspberry Pi with ease and security. By eliminating the need for port forwarding, you gain an even greater degree of control over your Pi's operations.
Whether you're managing servers, automating home devices, or developing IoT projects, understanding how to securely connect to your Raspberry Pi behind a router is crucial. With the strategies we'll explore, you can access your pi even when dealing with a NAT router, a situation where opening ports is not straightforward.
Let's imagine the user is struggling with connecting to their Raspberry Pi from outside their home network due to the presence of NAT. They might have already set up a DDNS (Dynamic DNS) service to access the Pi remotely. This article will explore ways around this.
Key Considerations for Connecting Raspberry Pi Behind a Router:
- Secure Shell (SSH): Crucial for remote command-line access.
- Port Forwarding: Necessary for direct access when not using alternative methods.
- NAT Traversal: Solutions for bypassing NAT restrictions, such as SSH tunneling or remoteiot service.
- Dynamic DNS: Useful for managing dynamic IP addresses provided by your ISP.
These points will be elaborated throughout this article. It is vital to understand these methods and tools, especially when you are a novice to networking. The intention is to enable you to connect to your Raspberry Pi behind a router.
Here is a table providing an overview of the steps involved in setting up remote access to your Raspberry Pi:
| Step | Description | Tools/Techniques |
|---|---|---|
| 1. Enable SSH on Raspberry Pi | This will allow you to remotely access your Raspberry Pis command line from another device. | Using the Raspberry Pi terminal, or via SSH on the local network. |
| 2. Configure Router (if possible) | Enable SSH and port forwarding on your router. | Access your router's configuration panel. |
| 3. Explore NAT Traversal Methods | If port forwarding isnt an option, consider SSH tunneling or remoteiot service. | SSH command line, Remote IoT service. |
| 4. Dynamic DNS (If applicable) | Set up a Dynamic DNS service if your ISP provides a dynamic IP address. | DDNS service provider (e.g., No-IP, DynDNS) |
| 5. Test Connection | From another device, attempt to connect to your Raspberry Pi remotely. | SSH client, web browser (if using remoteiot). |
As a starting point, we will review some basic information that will help you with this process. You'll need to install the remoteiot service, which provides a straightforward approach for remote management. Following the installation, you can open the remoteiot portal in your browser and access the dashboard.
For those who have a dynamic IP address, a Dynamic DNS (DDNS) service is useful. It enables you to connect to your Raspberry Pi even if the IP address changes. This service provides a static hostname that updates automatically to reflect the changing IP address. You can use a DDNS service if your ISP assigns a dynamic IP to your home network.
If your Raspberry Pi is behind a corporate firewall, connecting might require a different approach, particularly if SSH or VNC connections aren't allowed. In such instances, finding alternative solutions becomes essential.
As for the hardware, this guide is designed to be adaptable. You can use any Raspberry Pi board, as even the newest Raspberry Pi 5 is supported. And as for the image used, it is tiny, and the archive is less than 100 mb!
If you're ready to start, remember that connecting your Raspberry Pi behind a router is not as difficult as it might seem. This guide is designed to walk you through every step, ensuring that you gain the skills and confidence to manage your Raspberry Pi remotely, from anywhere.

